Thursday, June 6, 2013

The 40-second Omelet

I am truly sorry for not blogging for a while, so I will be posting two new recipes this week.

Wouldn't you want to wake up to a wonderful breakfast every morning? With this 40-second omelet, you can have the best meal in less than a minute. Your favorite meats, vegetables, seafood, even fruits can be packaged in between two eggs!

Materials

  • Two eggs per person
  • Two tablespoons of water
  • One tablespoon of margarine
  • 10-inch omelet pan
*Heat margarine in the omelet pan before starting and cook on the medium high level of the stove.*

       Steps 

  1. Beat the eggs and water together until it's completely blended.
  2. Pour the egg mixture in the heated pan. The mixture should set immediately at edges.
  3. With an inverted turner, carefully push cooked portions at edges toward center so uncooked portions can reach the hot surface.
  4. Tilt the pan and move pan as necessary. Continue until the egg is set and will not flow.
  5. Fill the omelet with 1/2 cup of desired toppings.
  6. Serve warm and ENJOY!!!!!!!!!!

Our finished product
Omelets are made of eggs, which are very healthy for a great breakfast meal! 

Saturday, April 20, 2013

Cabbage Stir Fry

Many people like to eat exotic foods. Today, we will visit India and make a common dish of India: Cabbage stir fry. The cabbage stir fry is made up of different spices and cabbage. Lets's begin!


Ingredients

  • One cup of cabbage ( chopped)
  • Salt (as per taste)
  • One pinch of mustard seeds
  • One pinch of asafoetida powder
  • Chili powder (as per taste)
  • 1/2 teaspoon turmeric
  • One teaspoon cumin coriander powder 
  • One boiled potato (peeled and chopped)
  • Two teaspoons of oil
  • Two teaspoons of water
Steps 
Cabbage Stir Fry
  1. First, heat up a non-stick pan on the stove and heat up the oil. Put mustard seeds cumin coriander powder and asafoetida powder in the oil. Be careful, the seeds can pop out!
  2. Second, put cabbage in the pan and mix. Then, mix the potatoes with the cabbage.
  3. Third, put chili powder, salt, turmeric, and stir the mix quickly.
  4. Next, pour the measured water over the vegetables and mix thoroughly.
  5. Last, keep the cabbage stir fry for 5-8 more minutes and serve hot!!!!!!
I hope you enjoy this common Indian dish!!

Friday, April 12, 2013

Baked Vegetables

Everybody loves eating tasty foods which are healthy. This recipe is a great way to get kids to eat vegetables with a smile! This dish has a variety of different vegetables and the main ingredient: cottage cheese. The cottage cheese will have different spices, which make the whole plate flavorful. Let's start!

Ingredients

  • One small slab of cottage cheese
  • Two onions
  • Two green peppers
  • Two half boiled potatoes (peeled and cubed)
  • Two tablespoons of oil
  • Salt (as per taste)\
  • Chili powder (as per taste)
  • Garlic paste (as per taste)
  • Chili paste (as per taste)
  • Ginger paste (as per taste)
  • Lemon juice (as per taste)
  • Chili flakes (as per taste)
  • Two pinches of turmeric
  • One teaspoon of curry powder
Steps

  1. First, cut the cottage cheese into small cubes and place them into a bowl.
  2. Then, add all the spices and pastes into the same bowl (salt, turmeric, chili powder, curry powder, ginger paste, etc...)
  3. Next, cut all the vegetables into big chunks and add them into the same bowl.  Then, put the measured oil in the mixture. 
  4. Fourth, mix thoroughly for 2-5 minutes. Marinate the mixture for two hours.
  5. Fifth, preheat the oven to 375 degrees fahrenheit.
  6. Sixth, put foil on an oven plate and drizzle oil on it.
  7. Seventh, bake for 40 minutes. But, while it is cooking, mix the vegetables around, so it can be crisp.
  8. Let the vegetables cool for 5 minutes.
  9. If you want, put the cottage cheese and vegetables on a stick and...
ENJOY!
A Crispy Mixture of Vegetables and Cottage Cheese
There are many other vegetables you can add to the vegetables like: carrots, sweet potatoes, mushrooms, or broccoli.


Friday, April 5, 2013

Blueberry Muffins

Everybody loves dessert, especially when it is low in calories. The blueberry muffin we will be making and delicious and healthy. This dessert is made with an alternative recipe. Instead of having lots of butter, sugar, and other unhealthy ingredients, these muffins have a good amount of everything. 
Food Facts: The blueberry muffins that we will be making today are a total of 150-250 (depending on size) calories. Other, store-bought muffins are usually 450-550 calories. This is why we are making homemade blueberry muffins. Let's begin!!

Ingredients
  • One cup of sugar
  • 1/2 cup of oil
  • Two eggs
  • One tablespoon of vanilla essence
  • One tablespoon of baking soda
  • 1/4 tablespoon of salt
  • Two cups of all-purpose flour
  • 1/2 cup of milk
  • Two cups of blueberries
  • Muffin oven tray 
Steps
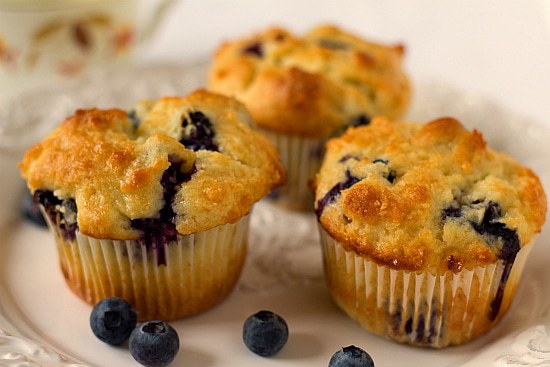
Homemade fresh blueberry muffins
  1. First, preheat you oven to 375 degrees fahrenheit.
  2. Second, put the measured flour, baking soda, sugar, and salt in one big bowl. (Mix fully)
  3. Third, add milk, eggs, vanilla essence and oil into the same bowl and mix properly.
  4. Next, put blueberries into the muffin mix and mix.
  5. Then, apply oil onto the oven muffin cups.
  6. Sixth, pour 1/4-/1/2 cup of mix into each muffin cup.
  7. Seventh, bake for 15-20 minutes (or 20-25 minutes, if you have a bigger batch.
  8. Lastly, when the muffin are golden-brown, let them cool for 3-5 minutes and...
ENJOY!! See you next week!

Friday, March 29, 2013

Salsa & Chips

Salsa and chips: the favorite Mexican appetizer. Many people go to different restaurants to get this valuable taste. Well, now you won't need to go to different Mexican restaurants. This recipe is a homemade snack, perfect to eat any time. So, let's begin!!

Ingredients

  • 3 tomatoes
  • Jalapeno (as per taste)
  • Onions
  • 1/2 lime 
  • 1/4 of green or red pepper
  • Salt (as per taste)
  • Plain tortilla chips
  • Black Pepper
  • Coriander leaves
Steps
Homemade salsa on chips
  1. First, cut all three tomatoes into small pieces and place them in a big bowl.
  2. Second, cut the jalapeno (slice as much you believe you need) and place it into the same bowl of the tomatoes.
  3. Third, cut 1/2 of an onion; chop them into very small pieces.
  4. Next, squeeze the lime's juice into the vegetable mix.
  5. Then, stir the mix and add salt and mix again. Optional: add a sprinkle of black powder.
  6. Sixth, use a heavy hand utensil : an iron skillet, to crush the vegetables- and fruits- into a thick liquid. If not all the vegetables are crushed, give them moisture : add water to the salsa.
  7. Seventh, crush the coriander leaves and add it on top of the salsa. To make it look professional, put a coriander leaf on the salsa.
  8. Eighth, pour out one serving (per person) of plains tortilla chips, then sprinkle ground black pepper and salt on top of the chips.
  9. Enjoy a great Mexican snack!!!!!!!!!!
Chips and salsa is a wonderful snack to eat at any time and place. It tastes even better since it's homemade!! Hope you liked the recipe.:)

Thursday, March 21, 2013

Egg Muffin Breakfast Sandwich

Have you ever run out of breakfast options? Well, then you can make this new and quick and easy recipe: Egg Muffin Sandwich. 
Food Facts: There are many place that sell breakfast sandwiches, like Dunkin Donuts, McDonalds, Burger King, etc. But, those sandwiches contain many unhealthy ingredients: they have high calories and fat. Such breakfast meals cannot be eaten daily. The sandwiches that we will be making, today, will have the perfect amount of calories and can be eaten daily. Let's begin!!!!

Ingredients
  • Low-fat English muffins (one whole muffin per person)
  • Salt (as per taste)
  • Pepper or chili powder (as per taste)
  • One or two eggs (per person)
  • Cheese (optional)
  • Butter (optional)
Steps
Egg Sandwich
  1. First, cut the English muffin in half and toast it for 3 minutes.
  2. Next, crack an egg into a glass bowl and add salt and pepper (or chili powder). 
  3. Third, heat up the egg mix into the microwave for 30 seconds, then 25 seconds.
  4. Then, when the egg turns into a mushy one and the English muffin popped out of the toaster, put the cheese (American cheese would be best) on the base of the sandwich.
  5. Fifth, put the egg on the muffin slice.
  6. Lastly, enjoy!!!!!!!!!!!!!!!!111
Egg sandwiches can be eaten as a snack, lunch, dinner, and definitely for breakfast. These sandwiches have low calories, which equal to: 200 calories. Hope you enjoy this recipe!!!!!!!!!!! 

Friday, March 15, 2013

French Toast

Everybody loves the regular French toast that is serves for a continental breakfast. Well, the one that we will be making today will be spicy! Let's begin!!


Ingredients You'll Need

Whisking eggs
  • Two breads per person
  • Two eggs per person (optional)
  • Chilis
  • Onions
  • Chili powder or black pepper (as per taste)
  • Salt (as per taste)
  • Square non-stick pan
  • Oil (as per your requirement)
Steps
  1. First, crack the eggs into a bowl or glass, like shown above, then mix it properly.
  2. Then, add the spices needed: salt, chili powder or black pepper, chilis, and onions. Mix the added spices in the egg.
  3. Next, put oil of the square non-stick pan and heat up the bread on the pan.
  4.  Fourth, once the bread has turned light brown, add half of the mix on the bread, (for one serving).
  5. Fifth, keep the egg bread on one side for 4-5 minutes. In total, the bread should be on the pan for 8-10 minutes.
  6. Serve warm, if you want, also serve with ketchup.
I hope your French toast is fantastic!

Friday, March 8, 2013

Ice Cream vs. Cake

Everybody loves ice-cream or/and cake, but what do you think is the best, read this special blog post and make your decision and vote on the poll.
Ice-cream
Ice cream was made long ago, in the Roman Empire, many people made different recipes of ice cream many decades, or even centuries ago. But those recipes transformed into today's ice-cream.  
Now, you can just go to the supermarket, pick up one of your favorite, and go home and eat it. Ice-cream is my personal favorite, since there are billions of flavors
Cake
Chocolate Cake
Cake, a great delicacy for common birthdays. There can be chocolate, vanilla, coffee, or nowadays even red velvet cakes. Cakes were actually made as an experiment, the effect of putting flour, milk, baking soda, sugar, and other materials, and popping it in the oven, cause a big cake. Then, it soon became a treat, usually eaten in birthdays, whereas ice-cream can be eaten whenever.

Ice Cream                                                Cake

ProsConsProsCons
There are many types of flavors. You can eat ice cream in an edible container (a cone).Ice cream can be low fat, but that does not mean that it should be eaten daily. Since cake is usually eaten in special occasions, it is okay to eat cake, rather than ice cream.Cake has a lot of calories in it which can slowly add onto weight, if eaten daily.
In conclusion, ice cream has more of a varietyIce cream is unhealthy, since it contains unhealthy ingredients.Cake is something that should be eaten rarely. But, mostly eaten in birthdays.Cake is not an everyday food.

Many people enjoy these two treats, one and/or the other. Which one do you like? Vote on the poll above, and/or add a comment!! Tell us your thought!!!

Top 5 Creations of Cake

  • Red velvet cake
  • Chocolate Cake
  • Vanilla Cake
  • Coffee Cake
  • Ice Cream Cake
Ice Cream Cake
Top 5 Creations of Ice Cream

  • Milkshake
  • Different flavors if ice cream
  • Ice Cream Sandwich
  • Ice cream on a stick
  • Ice Cream Cake

Thursday, February 28, 2013

Chocolate vs. Vanilla

Everybody loves sweets, especially chocolate and vanilla. Which one is better? Let's find out!
Chocolate:
Chocolate is a special sweet that is formed into many different type of desserts. There are also many types of chocolate: white chocolate, dark chocolate, milk chocolate, coffee chocolate, and many more. Even though chocolate is full of calories, it is used for (dark) chocolate mousse, which doesn't contain much fat. There are many things that chocolate condenses in to many different desserts, which makes the chocolate a great ingredient to use when making a dessert. People have figured out how to make chocolate into many different things, like Breyer's Triple Chocolate Ice-Cream Combination.
Vanilla:
Vanilla Flower
Vanilla comes from a fresh way, from a flower! There are many ways we use vanilla when it comes to desserts. Vanilla is most helpful when we are making cake, cookies, or pastries, because we need vanilla essence to keep in the mix. Without vanilla, we would not be able to make tasty cakes! When it comes to vanilla, we need it for almost every sweet. Even though vanilla doesn't come in different types, there is always that one type we love the best and that is ice-cream!

Pros and Cons Of Chocolate                                   Pros and Cons Of Vanilla
ProsConsProsCons
Chocolate can be turned into many delightful desserts.It can be very fattening if too much is consumed.Vanilla essence is commonly used in desserts.There is not a  variety of options for  vanilla dessert, besides ice cream & cake.
There are many types of chocolate, white, coffee, milk, peanut butter,dark, and mint chocolates.Chocolate is unhealthy, since it contains a lot of sugar, or HFCS.Vanilla helps make cakes and pastries. And it comes from a fresh product, the vanilla flower!Vanilla is not as varied as chocolate and chocolate comes with different desserts.
Chocolate is full of variety.Chocolate is not a daily food to be eaten.Without vanilla, we would not have sweets.Vanilla is not as tasty as chocolates.


Top 5 Chocolate Creations

  • Chocolate Mousse
  • Chocolate & Strawberries
  • Chocolate Icing Cake
  • Chocolate Chip Cookies (Double Chocolate)
  • Triple Chocolate Ice Creams
Top 6 Vanilla Creations

  • Vanilla Ice Cream
  • Vanilla Mousse
  • Vanilla Tiramisu
  • Vanilla Cake
  • Vanilla Icing
  • Vanilla Essence

Thursday, February 21, 2013

Home-made Fries

Everybody just loves fast food, like fries, chips, and other unhealthy, calories filled snacks. They go to restaurant like McDonalds, Wendy's, Burger King, and other restaurants, sometimes just to fill themselves with fries. But, there are so many other healthy choices you can make. Instead of going to fast food restaurants, you can make a trip to the supermarket. Let's get started!!!
Items You'll Need

  • 1/2 potato (per person)
  • Salt (as per your taste)
  • 1/2 lime 
  • Chili powder (as per your taste)
  • 1-2 tablespoons of canola oil
Steps

  1. First, take the potato and skin the vegetable, and then cut the potato, in any way you want! (Make sure to make the pieces big)
  2. Then, take a non-stick pan and heat it on the stove, add the measured oil on the pan, spread it around the pan.
  3. Next, put the potato wedges on the pan.
  4. Fourth, keep the potatoes on the pan for 5-10 minutes, or until they turn brown.
  5. Fifth, while the potatoes are taking there time grilling, add salt on the vegetables and with a spatula, flip the potatoes.
  6. Sixth, turn the stove off and let the fries cool for 3 minutes.
  7. Baked Fries
  8. Last, put chili powder and lime juice on the fries.
By putting chili powder and lime juice on the fries, you are getting a sour and spicy flavor, which are a good combination. Baking is surely better than frying it. This particular recipe is great for the entire family. So, how did you like this recipe?
Answer in the comment box below!!!
See you next week!!!!!!!

Saturday, February 16, 2013

Indian Fried Rice

You all have eaten Chinese fried rice, but have you eaten Indian rice. This is a well known dish, with an enticing flavor to it. It is healthy and full of Indian spices.
Food Facts: Everybody has eaten Chinese rice, but do you know that the ones that you eat in restaurants or buy from frozen brands can contain a lot of sodium and oil. This means that eating any fried rice from stores is unhealthy, so this is why we will be making Indian fried rice!! Let us get started!!!!!!!!

What You'll Need

  • Cooked rice (one cup per person)
  • Half or one chopped onion
  • One teaspoon of chili powder
  • 1/2 tablespoon turmeric
  • Salt (as per taste)
  • 1/2 teaspoon of mustard seeds
  • One pinch asafoetida powder
  • Two-three tablespoons of oil
Steps
Indian Fried Rice
  1. First, take the measured oil and pour it in a pan, then add mustard seeds.
  2. Second, once the seeds crackle, put asafoetida powder in the oil.
  3. Then, put the boiled rice in the oil.
  4. Fourth, put salt, chili powder, onions, and mix thoroughly.
  5. Next, fry for 3-4 minutes and adjust the taste of the rice.
  6. Serve warm, and enjoy!!!!!!!!!!!!!!!!!!!!!
I hope you enjoy this Indian specialty. How did you like this recipe?
Answer in the comment bow, below!!!!!!!
See you next week!!!!

Friday, February 8, 2013

Cottage Cheese Sandwiches

Today, we will be making a special type of sandwich, which is healthy and really delicious. So let's learn more about this sandwich!!!!
Food Facts: Everybody has eaten grilled cheese sandwiches, but do you know that eating those sandwiches. You are eating a sandwich that contains many unhealthy ingredients, creating them really tasty, which makes us want to eat more of them. But this sandwich is a different one, it is healthy, created by only fresh ingredients, and is easy to make! Let's get started!!!!

Items You'll Need

  • One cup of shredded cottage cheese
  • One chopped onion
  • One cut tomato
  • Salt (amount needed as per your taste)
  • Pepper, black or red (amount needed as per your taste)
  • Chili powder (amount needed as per your taste)
  • Curry powder (amount needed as per your taste)
  • Two breads, per person
Steps You'll Need To Take

  1. First, you'll need to put the shredded cottage cheese, tomato, and onion in a bowl and mix properly.
  2. Next, mix the salt pepper, chili powder, and curry powder in a small bowl, and mix.
  3. Then, combine the two mixes, in a large bowl, and mix thoroughly. Apply the mix onto the breads.
  4. Fourth, toast your sandwich, to make it taste fresh.
  5. Last but not least, ENJOY!!!!!!!!!!!!!!!!!!
Eat this sandwich with any dip you like, from ketchup to garlic sauce, everything goes with cottage cheese sandwich. 
I hope you enjoyed, leave your comment in the box, below. See you next week!


Thursday, January 31, 2013

Bow-Tie Pasta

Today, we will be focusing on a very common Italian dish, usually eaten in different Italian grills. But, after today's recipe, you won't have to go to restaurants to get what you want. And, so, we will make bow-tie pasta, a creative delicious dish!!!!!
Food Facts: Many people go to restaurants, which may not serve healthy or fresh food, like pasta. They can either be frozen made, or can be inserted with a lot of unhealthy ingredients. Other people may get the store-bought, frozen pasta, which contain a lot of cheese, that is not good for your body. This is why we will make homemade pasta!! Let's get started!!!!!!!!!!

What You'll Need
  • One quarter of bow-tie or regular pasta (per person)
  • One cup pasta sauce ( I recommend Ragu's Sauteed Onion and Garlic Sauce, or any other type you would like)
  • One tablespoon of Canola oil
  • 2-3 chopped cloves of garlic
  • One chopped onion
  • 2-3 chopped basil leaves
  • 7-9 cups of water
Steps You'll Need To Take
  1. First, take 7-9 cups of water, keep it in a pot, and add a little salt, to get taste.
  2. Then, boil the water over the stove, once it boils, add the pasta then let it cook. Then, take the pasta and keep it in a strainer, wait until it dries.
  3. Third, then in a wok and the measured oil, the chopped garlic, and then chopped onion, or any other vegetable you like, take that and stir fry for 3 minuted. 
  4. Fourth, add the pasta sauce in the mix and fry the puree for one minute.
  5. Fifth, once the pasta sauce warms up, add the pasta into the sauce, and mix, properly, until all ingredients are mixed thoroughly.
  6. Sixth, keep the pasta on the stove for 2-3 more minutes, and if you want add a little cheese on the pasta.
Pasta is a great, healthy meal for the entire family to enjoy. It's a quick and easy thing to make, so hopefully you liked the recipe!!!
See you next week!!!

Wednesday, January 23, 2013

Potato Stir Fry

Today's recipe is an incredible Indian dish. It is called potato stir fry, it is delicious,  this certain recipe is very healthy, including various Indian herbs. The spices give good taste to the potato. 
Food Facts: This dish is full of healthy ingredients and is very yummy when it's homemade. Other vegetable stir fries are very hard to make. This one is very easy to make and does not require much time in making this. Store bought meals are usually frozen, which make them unhealthy. This is why we are making potato stir fry! Let's start!!!!

What You'll Need
  • One boiled potato (per person)
  • Two tablespoons of canola oil
  • 1/2 teaspoon of mustard seeds
  • 1/2 teaspoon of cumin 
  • 4 to 5 curry leaves
  • One pinch of asafoetida powder
  • One tablespoon of chili powder (as per your taste)
  • 1/2 teaspoon of turmeric 
  • Salt (as per your taste
  • One teaspoon of cumin powder
   Steps You'll Need To Take
Ready- Made Potato Stir Fry
  1. First, peel the boiled potatoes, and then cut them into square pieces.
  2. Then, pour the measured oil into a non-stick pan and heat it to a high temperature on the stove and put the cumin seeds and mustard seeds into the oil as it heats. When it crackles, be sure you won't burn yourself, since it can sputter out of the pan.
  3. Third, add asafoetida powder to the mixture, and add the chopped potatoes.
  4. Fourth, add the chili powder, cumin, curry leaves, salt, and turmeric.
  5. Fifth, stir the potatoes for 5-10 minutes, and your Indian dish is ready!!!!
You can eat potato stir fry with bread, or Indian roti (which I recommend.) And I hope you enjoyed this recipe!!!!
Tell me what you think, answer in the comment box, below!!!!!
See you next week!!!!!!!!!!!!!!!!!!!!

Thursday, January 17, 2013

Chocolate Cake

Everybody in the family loves cake, especially when it is homemade, and has a fantastic filling!
Food Facts: Homemade cake is always yummy, when you follow the steps the right way. Store-bought cake always contains too much sugar and cream, making it unhealthy and on top of that, the amount of cream put onto one cake makes the cake inedible. Everybody loves homemade cake, and it is more enjoyable when it is made the perfect way! So follow these steps!!

What You'll Need For The Cake
  • 1 ¾ cups of all- purpose flour
  • One teaspoon of baking soda
  • 2/4 teaspoon of fine salt
  • ¾ cup of Dutch-process cocoa powder (other types of chocolate powder are fine, too)
  • cup of boiling water
  • cup of whole milk (room temperature)
  • Twelve tablespoons of unsalted butter
  • Two cups of granulated sugar (other types of sugar is fine)
  • Two teaspoons of vanilla essence
  • Three large eggs (white eggs)
MATERIALS FOR THE FILLING
  • One cup of heavy cream
  • Hershey’s Syrup
  • One- two teaspoons of sugar (as per your taste)

Making yummy cake like this also needs caution, like when you are placing the cake inside the oven, be careful that your bare hand does not the metal part of the oven. (Which will be extremely hot.) Also when you are mixing the ingredients, be sure to mix them without spilling anything, that can cause a sticky mess. Another caution is to work on a flat surface, so no materials are knocked over.

Steps For The Chocolate Cake

  1. 1. First, preheat the oven to a temperature of 350 degrees fahrenheit.

  1. 2. Second, whisk the all-purpose flour, salt, and baking soda together in a large bowl.Mix until the materials are purified.

  1. 3. Third, in another bowl, whisk together the cocoa powder, milk, and boiling water, then keep it aside.

  1. 4. Fourth, place the measured butter in a large bowl of a stand mixer fitted with a paddle attachment and beat the butter on a medium-high speed.(for safety) Keep mixing the butter until it’s fluffy and light in color. While you are mixing the butter, also add the granulated sugar and the vanilla essence.

  1. 5. Fifth, add a half of your flour mixture into the stand mixer and stir the mix until it’s all incorporated. Then do the same for the cocoa mix. Add a half of the cocoa mix and stir that until everything is purified. Continue doing this with the rest of the cocoa and flour mix.

  1. 6. Sixth, once you have prepared the batter, take an oven bowl, apply flour to its sides- it does not get sticky after baking it. Pour the batter in the bowl and keep the plate in the preheated oven. Bake for 30 minutes.

  1. 7. After baking, make sure that the inside is also dry. To make sure, insert a toothpick in the cake. If the result is slightly crummy, your cake is ready! ( If not, bake for 5-10 more minutes.)

  1. 8.  Once it’s done, let the cake cool for 20 minutes. Then, cut the cake out of the plate and let it cool for 30-45 minutes. Meanwhile, make the chocolate filling.

STEPS FOR THE FILLING


1. First, take the heavy cream keep the measured amount in the stand mixer. Mix for 3-6 minutes, until it’s thick and creamy.
2. When you are mixing, add the amount of Hershey’s Syrup you need and the sugar you need. Make sure all the materials are properly mixed, in order to taste yummy.
3. Keep mixing, and you should have a chocolaty whipped cream.
4. Next, carefully cut half of the cake off the top, and carefully, place it in a safe place. Keep some of the whipped cream on cut area, and place the top of the cake back on the cream.
If you have cream still remaining, you can make a little design on your cake, for an important occasion, by, putting the cream in a plastic bag, sealing it, cutting the corner of the bag and making any design on the cake, you want!!
5. Fifth, gently place the cake in the refrigerator and eat it cold or warm!

6. ENJOY THIS CAKE!
Chocolate Cake with Chocolate Shredding
Chocolate cake is a great dessert for a party or any other occasion - especially one that has a tasty filling. The filling for this cake can vary. Strawberry, vanilla, coffee, you can even keep ice-cream if you like! You can also keep whatever topping you like, like in this image, you can apply chocolate shredding.
What did you think of this recipe?
answer in the comment box below
see you all next week!

Wednesday, January 9, 2013

Quesadillas

Happy New Year's everyone!!! 
To start off the new year, we will be making a delicious, Mexican food, QUESADILLAS!!! Quesadillas are a thin pocket of beans, rice, and other meats and vegetables.
Food Facts: Store bought quesadillas usually contain a lot of cheese which is not very healthy and also is frozen, which means it is not that fresh, making it unhealthy. And quesadillas may not be the kind you want in restaurants, so this is why we will be making a home-made style quesadilla!! Your own type, style and topping!
LET'S GET STARTED!
What You'll Need

  • One block of cheese ( mozzarella or american cheese)
  • One tortilla (per person)
  • Black beans (ready made)
  • Long grain rice (ready made)
  • Green onions
  • Green Peppers
  • Jalapenos
  • One - three tablespoons of canola oil 
  • Non- stick pan
  • Griddle
  Steps You'll Need To Take

  1. First, grate the block of cheese and set aside.
  2. Second, heat up the non stick pan and keep one-two tablespoons of canola oil in the pan and let it broil.
  3. Third, cut the vegetables and starting cooking them.
  4. Fourth, add the vegetables onions and the green peppers into the pan and cook it until it sizzles and it's golden brown. While it's cooking add salt, (keep the amount as per your taste) and mix.
  5. Then, when the vegetables are ready, let them cool and apply the cooking spray on the griddle, then heat the griddle and keep your tortilla on the pan and warm the tortilla until it is golden.
  6. Next, take your beans and heat it up in a pot over the stove for two minutes. Do the same with the rice.
  7. Seventh, once your vegetables, beans, and rice are ready starting stuffing your tortilla.
First you can put the amount of cheese you want, then keep the vegetables you want on the cheese. Then, add the rice and beans as the last layer and close the pocket and eat warm!

Quesadillas

You can eat quesadillas with different types of dips, like as shown in the picture to the left. With a side of mild salsa, guacamole, or sour cream.


I hope you enjoy eating this delicious, healthy, homemade, Mexican meal. How did you like this recipe? How did this taste? What dips did you choose? Answer in the comment box below! 
See you next week!